Thursday, 7 April 2016

Puting Throne, Hammer and chain on model

Now I have got the statue figure out the way, it was time to focus on doing the extras...in other words to model and throne, hammer and armour. I started with making the throne. The throne itself was easy to model. It was mostly extruding a cube and combining two other cubes to form a chair. Then at the top of the chair I cut a circular shape to make it look rounded. 

The Hammer:
Making the hammer wasn't as difficult as I thought it would be. It was simply just extruding and changing the vertex's shape so that the faces on the model would match each other. I developed this idea by just 'going forit' and see how it looks. Safe to say that I enjoyed this that I might consider adding more weapons in the battle arena...if I have time.

Armour:
Making the chains was using the hoop model and changing the divisions and sides to a smaller amount. This gave the hoop less poly count and I then duplicated them until I made a chain. (And yes I know I could have done this on Zbrush..but never mind). After making the chain I created a cube cut and extruded the object until it looked convincing enough to be a sharp shoulder pad for my statue.

Entire Model Together:
This is what my statue looks like with all the objects put together. So far so good.

My objects and adding the right texture to it.


Texture for Chain, Throne and Hammer:
For the texture I had to alter a few things. Using the statues texture and then getting rid of the lines (by going on Photoshop and using the spot healing brush and making it a lighter grey) , I was able to make the texture for the other models. 
This was the statue texture being changed and used for throne, hammer and chains.

Final Objects Modelled:
This is the texture that I am going to use for my final statue design. This texture was perfect because it blends in well with the statue, yet is much lighter than the statue itself, so everyone can see it. I was pleased with what I have achieved considering the time I have left. Let us see what I can do with all this being placed inside my battle arena.

Friday, 1 April 2016

Battle Arena Re-made

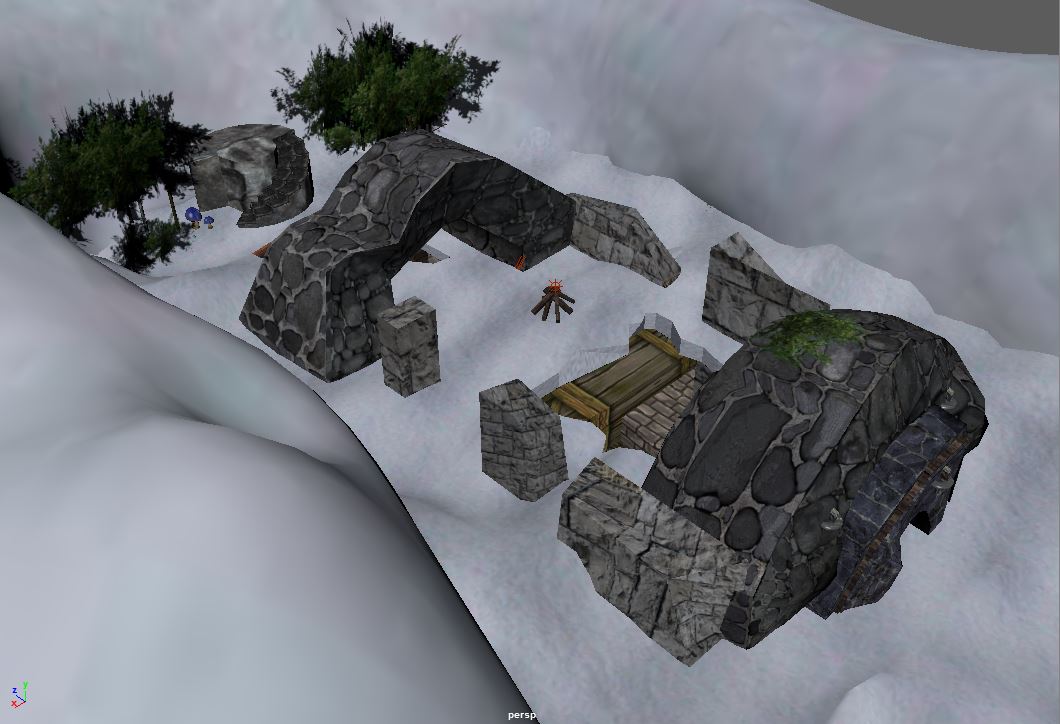
The image bellow shows my battle arena remade. I felt this was very necessary for improving the arena. Especially after gaining feedback from my tutor to improve the model.  The first thing to change was the mountains themselves. For this I used cloth effect, simply because I couldn't model mountains that well. Though this wasn't the best way of making a mountain model, I was satisfied with the result and it by far looks better than my original attempt.

I also changed a few other things since the last time I uploaded my battle arena, including:


New Textures and Models: 
Both inside and outside the cave had to be changed, for example I got rid of one of the pillars and changed the chairs. But the main changes was the textures. From the snow to the walls around the room. I also used the same textures of the statue for the stairs.

As I said before, I changed the snow texture by using a different image from Google, and it looks much better and more convincing. I also changed the texture of the ruins to match the wall texture down stairs.

I felt as though I needed something to help give a good introduction for my animated camera scene on unity. So I pushed the snow downwards and added stairs to give the cave/temple an entrance. Usually temples and caves would be at high places, so it would make sense to  have huge stairs to a holy place or a place of rich history. 


The final thing I improved was the stair way for the statue. This wasn't as easy as I would have hoped, because the UV mapping for this took a while to sort out and tidy up. However, once I finished the UV mapping for it, I used the texture from the statue and (just like the chain and throne texture) used the spot healing brush to get rid of the lines. This would blend in well with my statue as I plan on place it on top.


These changes improved my battle arena hugely and I was glad that I went back and improved it as I was more confident with my modelling skills then when I first started the year.  

Saturday, 19 March 2016

Drawing on the train (extra work):

These were just quick sketches I did while I was on the train to work. I do begin to feel much more comfortable drawing people now. Its really interesting, you can see each person having different shapes and expressions on their faces. Who knows, I might come back to these sketches and use them for a future project.

Wednesday, 16 March 2016

Final Background Designs

These are my fianl background designs for my groups game. Though originally we planned on making 8 levels, we ahd to rearrange it 6 because each background took me a while to complete. Not only for concept design , but fr changing the style to pixel art. I managed to make four of the six backgrounds whilst one of my team memebers made the last two.
Scene 1: snowy forest
Scene 2: snow mountains
Scene 3: Sci Fi room
Scene 4: Sci Fi blue room


Monday, 14 March 2016

brush technique and speedpaint

Quick blob texture practice:
This was just a quick texture brush practice with a blob. 


Bobby Chiu image:

Task: For this exercise, we had to work in small (by zooming out) for the first 30 minutes of the lesson. We also block out the broad areas e.g. blues and the orange. Then for the second half of the lesson we had to work on the details, for this we could zoomed in more. This involved adding the white patches of the while skin, the boys eyes and so on. 

after 2 hours:

making the 1 scene and 4th scene

These were my last background designs. to try and make the forest scene. I started with a basic style of just having straight tree trunks. Followed by adding basic mix of purple and blue snow. and then having three different levels of colours in the background.
 This image shows my piece adding branches to the trees. However I thought the background was to light, so I had to darken the trees and the green area and add a lighter texture to the snow.
 This was my final design for the snowy forest scene. As shown down bellow I changed the scene a little by adding more snow and giving the piece a smoke effect on Photoshop. I am really pleased with the end product and will continue to work on my second sci fi room.

Forth background:
This is my final background I managed to do. This is the 4th scene in the game as the player enters the sci fi room. This piece was one of the easiest background designs I had done throughout the project. For this I used bits from my previous sci fi room. As well as adding a new effect (adding the blue glow effect). 

This is the finished background design of the Sci fi room (scene 4). I played around with the glow effects and added more shapes and colours. For example the tubes and the grey panels. I ma very pleased with how this worked out and this personally is one of my favorite backgrounds I made simply because I experimented with different style and used different techniques from the other backgrounds. 

Saturday, 12 March 2016

Space ships

The homework for the next 2 weeks is to design our own Space ship. Depending on whether I want it to be a battle space ship or just for transport. However I might try to combine the two just to experiment a little.

Moodboard:


Rough Sketches:

This first two drawings are designed to be a combination of a tour bus that we use at the present time. But I changed it a round a little and designed to make it a futuristic taxi. 
This second sketch is a more violent machine. A one seater is influenced by having the same fire power as a tank. Yet can glide into space with ease. I also got inspired by the star wars design of Boba Fett's ship. You can see the amount of detail that was put in for Boba Fett's ship, as it does look like something that is possible to make in a 100 years time or so. That is something I will try and aim for my final design. 
This last one was a rough 5 minute drawing, but I liked the design so much that I have now considered to use it for the project. I might consider going back and re-sketching it to give it a cleaner and neater design.  

Final Idea:
This was a rough final design of what I wish to make my space ship look like.

Modelling Spaceship on Maya:


Techniques and References used for Final Design:

Bush I used for scratch mark effect.
Technique used to make shine on metal. Followed this video to learn this effect:
https://www.youtube.com/watch?v=FBYYQFXD1Ho

Final design pose:
So I chose this position for my final pose. Now I plan on colouring it and adding textures to it.

Final pose with colour:
Using the same technique as my gun classwork, I placed textured images from Google and added colour to help form my ship. After spending 12 hours on this I final got the final result. I also quickly did a simple space texture in the background to add more effect to the work.
Final Design:
This is 'The Rust Bucket'. An old military prototype, The Rust Bucket is a five seater vehicle. With the main cockpit having two seats for the pilot and co-pilot. Whist also having a one seater on each wing. The wing pilot is in charge of the machine guns, and the main cockpit is in charge of firing rockets and steering the ship.

Though I managed to improvise and got a fairly good final piece. I felt as though I could have got a better result had I used shadowing on my when I was rendering. It was frustrating because I remembered doing it in one of my Maya lessons. However it was late during the Easter holidays and I was running out of time. So as I said before, I had to improvise by finding where the light might come from and where would the darks be on each material. Never the less, I was still pleased with my efforts. I feel as though I am improving and progressing with my designs and sketch's, but I will need more time to get even better.