Thursday, 22 September 2016
Wednesday, 14 September 2016
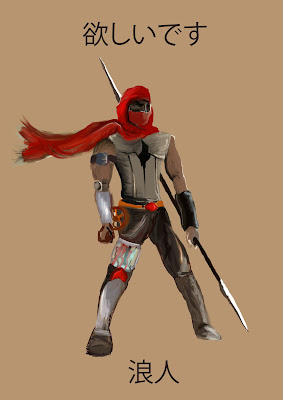
Summer Project
Moodboard for summer project:
Moodboard for Martial Arts poses:
Characters Narrative:
Rough Idea for characters design:
Hand Drawn Design:
Side view of character in action:
Rough 3 poses for model sheet:
Idea to add more to this character:
Final Design With Colour:
Model Sheet:
Monday, 18 April 2016
Final Battle Arena and Statue on UNity and Maya:
This is it. The Final end product. I can not say in words how proud and happy I am to complete this. I do have regrets not adding more or doing any better, however I am still impressed with what I have managed to do. Not only one battle Arena, but two in one! Upstairs and downstairs. For this project it was great fun....stressful at times and a learning curve, but fun non the less. Lets see how I do for next year to top this.
Thursday, 14 April 2016
adding weapons
This was just to add extra and make my battle arena feel more like...well a battle arena. Modeling the weapons isn't the issue, its giving them texture that will take the longest. I had to use UV snapshot and colour them in Photoshop. I managed to make 3 weapons.
Axe:
Shield:
Sword:
Tuesday, 12 April 2016
Combining my final pieces
Though this does seem like a random side project, for me it makes perfect sense. As I was scanning through my blog, I began to see many opportunity to compile my final pieces, such as the frog, the incest and the tree. I might not have time to finish this ambitious task, however I might be able to finish it over the summer.
Friday, 8 April 2016
Learning Particle effects and put in battle Arena
We move onto the detailed stuff now. Some extra effects to make the battle arena feel more alive. We practised using particle effects. This can be used with variety of elements such as snow, fire, fog, rain and more. So this would be pretty handy to use. We had a lesson on how to create a fire effect on unity using one that my tutor had done for his battle arena. Firstly we went on the Particle System on (standard assets) and in prefabs was the steam particles. Placing the steam particles near the vase we then changed the settings on Start speed and Life speed up (as well as the rate set), so that it was closer together and came out in vast numbers. We then had to download the images of fire (from unity) and used the image to make the flame effect. This was to be dragged onto the scene and placed with the steam particles. We then did a similar thing for the smoke effect, only instead of speeding up the particles and putting the rate settings on high, we moved it to lower numbers, to give that slow smoke effect. we also moved the particles closer for the smoke effect as well.
What it was like at the start:
My final fire effect:
My participial effect being used in Battle Arena:
The first particle effect used was to make the snow fall in my battle arena. This was a simple by changing the settings. For example I changed the amount of snow flake fall by making the ' Emisson' rate set to 5. The start of this effect was similar to the fire effect. Using the Particle System - Prefabs -Steam. Once placing it on the scene I changed the settings on shape, making the snow flakes small and light.
I used the same fire effect as the one I did during lessons. Then afterwords just duplicated them into different parts of the arena, including inside the cave. However I had to have the fire give off enough light, so I added a point light near the fire.
The cloud effect was the easiest one to do. I added a DustSheet effect on top of the battle arena. Changed the colour from yellow to white, and made the dustsheet slower by changing the Start Lifetime and Start Speed.
The last effect I used was the Lighting effect coming from outside through the caves holes. I downloaded this effect online and used its file for this effect, just to add more light to the scene.
Final Look on Statue
This is the final design of my Viking Statue. I will show both the Maya and Unity versions. The first image is just what it looks on Maya.
And the Unity version is what it looks in the Battle Arena.
I'm really pleased with the final result. It looks like I wanted it to look. A Badass!
Thursday, 7 April 2016
Puting Throne, Hammer and chain on model
Now I have got the statue figure out the way, it was time to focus on doing the extras...in other words to model and throne, hammer and armour. I started with making the throne. The throne itself was easy to model. It was mostly extruding a cube and combining two other cubes to form a chair. Then at the top of the chair I cut a circular shape to make it look rounded.
The Hammer:
Making the hammer wasn't as difficult as I thought it would be. It was simply just extruding and changing the vertex's shape so that the faces on the model would match each other. I developed this idea by just 'going forit' and see how it looks. Safe to say that I enjoyed this that I might consider adding more weapons in the battle arena...if I have time.
Armour:
Making the chains was using the hoop model and changing the divisions and sides to a smaller amount. This gave the hoop less poly count and I then duplicated them until I made a chain. (And yes I know I could have done this on Zbrush..but never mind). After making the chain I created a cube cut and extruded the object until it looked convincing enough to be a sharp shoulder pad for my statue.
Entire Model Together:
This is what my statue looks like with all the objects put together. So far so good.
My objects and adding the right texture to it.
For the texture I had to alter a few things. Using the statues texture and then getting rid of the lines (by going on Photoshop and using the spot healing brush and making it a lighter grey) , I was able to make the texture for the other models.
This was the statue texture being changed and used for throne, hammer and chains.
Final Objects Modelled:
This is the texture that I am going to use for my final statue design. This texture was perfect because it blends in well with the statue, yet is much lighter than the statue itself, so everyone can see it. I was pleased with what I have achieved considering the time I have left. Let us see what I can do with all this being placed inside my battle arena.
Friday, 1 April 2016
Battle Arena Re-made
The image bellow shows my battle arena remade. I felt this was very necessary for improving the arena. Especially after gaining feedback from my tutor to improve the model. The first thing to change was the mountains themselves. For this I used cloth effect, simply because I couldn't model mountains that well. Though this wasn't the best way of making a mountain model, I was satisfied with the result and it by far looks better than my original attempt.
I also changed a few other things since the last time I uploaded my battle arena, including:
New Textures and Models:
Both inside and outside the cave had to be changed, for example I got rid of one of the pillars and changed the chairs. But the main changes was the textures. From the snow to the walls around the room. I also used the same textures of the statue for the stairs.
As I said before, I changed the snow texture by using a different image from Google, and it looks much better and more convincing. I also changed the texture of the ruins to match the wall texture down stairs.
I felt as though I needed something to help give a good introduction for my animated camera scene on unity. So I pushed the snow downwards and added stairs to give the cave/temple an entrance. Usually temples and caves would be at high places, so it would make sense to have huge stairs to a holy place or a place of rich history.
The final thing I improved was the stair way for the statue. This wasn't as easy as I would have hoped, because the UV mapping for this took a while to sort out and tidy up. However, once I finished the UV mapping for it, I used the texture from the statue and (just like the chain and throne texture) used the spot healing brush to get rid of the lines. This would blend in well with my statue as I plan on place it on top.
These changes improved my battle arena hugely and I was glad that I went back and improved it as I was more confident with my modelling skills then when I first started the year.
Saturday, 19 March 2016
Drawing on the train (extra work):
These were just quick sketches I did while I was on the train to work. I do begin to feel much more comfortable drawing people now. Its really interesting, you can see each person having different shapes and expressions on their faces. Who knows, I might come back to these sketches and use them for a future project.
Wednesday, 16 March 2016
Final Background Designs
These are my fianl background designs for my groups game. Though originally we planned on making 8 levels, we ahd to rearrange it 6 because each background took me a while to complete. Not only for concept design , but fr changing the style to pixel art. I managed to make four of the six backgrounds whilst one of my team memebers made the last two.
Scene 1: snowy forest
Scene 2: snow mountains
Scene 3: Sci Fi room
Scene 4: Sci Fi blue room
Monday, 14 March 2016
brush technique and speedpaint
Quick blob texture practice:
This was just a quick texture brush practice with a blob.
Bobby Chiu image:
Task: For this exercise, we had to work in small (by zooming out) for the first 30 minutes of the lesson. We also block out the broad areas e.g. blues and the orange. Then for the second half of the lesson we had to work on the details, for this we could zoomed in more. This involved adding the white patches of the while skin, the boys eyes and so on.
after 2 hours:
Subscribe to:
Comments (Atom)


