Showing posts with label 3D Art production. Show all posts

Wednesday, 14 September 2016

Summer Project

Moodboard for summer project:


Moodboard for Martial Arts poses:

Characters Narrative:

Rough Idea for characters design:


Hand Drawn Design:
Side view of character in action:
 Rough 3 poses for model sheet:
 Idea to add more to this character:


Final Design With Colour:


Model Sheet:


Monday, 18 April 2016

Final Battle Arena and Statue on UNity and Maya:

This is it. The Final end product. I can not say in words how proud and happy I am to complete this. I do have regrets not adding more or doing any better, however I am still impressed with what I have managed to do. Not only one battle Arena, but two in one! Upstairs and downstairs. For this project it was great fun....stressful at times and a learning curve, but fun non the less. Lets see how I do for next year to top this.


Thursday, 14 April 2016

adding weapons

This was just to add extra and make my battle arena feel more like...well a battle arena. Modeling the weapons isn't the issue, its giving them texture that will take the longest. I had to use UV snapshot and colour them in Photoshop. I managed to make 3 weapons.
Axe:
Shield:


Sword:


Friday, 8 April 2016

Learning Particle effects and put in battle Arena

We move onto the detailed stuff now. Some extra effects to make the battle arena feel more alive. We practised using particle effects. This can be used with variety of elements such as snow, fire, fog, rain and more. So this would be pretty handy to use. We had a lesson on how to create a fire effect on unity using one that my tutor had done for his battle arena.  Firstly we went on the Particle System on (standard assets) and in prefabs was the steam particles. Placing the steam particles near the vase we then changed the settings on Start speed and Life speed up (as well as the rate set), so that it was closer together and came out in vast numbers. We then had to download the images of fire (from unity) and used the image to make the flame effect. This was to be dragged onto the scene and placed with the steam particles. We then did a similar thing for the smoke effect, only instead of speeding up the particles and putting the rate settings on high, we moved it to lower numbers, to give that slow smoke effect. we also moved the particles closer for the smoke effect as well.

What it was like at the start:
My final fire effect:


My participial effect being used in Battle Arena:

The first particle effect used was to make the snow fall in my battle arena. This was a simple by changing the settings. For example I changed the amount of snow flake fall by making the ' Emisson' rate set to 5. The start of this effect was similar to the fire effect. Using the Particle System - Prefabs -Steam. Once placing it on the scene I changed the settings on shape, making the snow flakes small and light.

I used the same fire effect as the one I did during lessons. Then afterwords just duplicated them into different parts of the arena, including inside the cave. However I had to have the fire give off enough light, so I added a point light near the fire.

The cloud effect was the easiest one to do. I added a DustSheet effect on top of the battle arena. Changed the colour from yellow to white, and made the dustsheet slower by changing the Start Lifetime and Start Speed.
The last effect I used was the Lighting effect coming from outside through the caves holes. I downloaded this effect online and used its file for this effect, just to add more light to the scene.


Final Look on Statue

This is the final design of my Viking Statue. I will show both the Maya and Unity versions. The first image is just what it looks on Maya.


And the Unity version is what it looks in the Battle Arena.

I'm really pleased with the final result. It looks like I wanted it to look. A Badass!

Thursday, 7 April 2016

Puting Throne, Hammer and chain on model

Now I have got the statue figure out the way, it was time to focus on doing the extras...in other words to model and throne, hammer and armour. I started with making the throne. The throne itself was easy to model. It was mostly extruding a cube and combining two other cubes to form a chair. Then at the top of the chair I cut a circular shape to make it look rounded. 

The Hammer:
Making the hammer wasn't as difficult as I thought it would be. It was simply just extruding and changing the vertex's shape so that the faces on the model would match each other. I developed this idea by just 'going forit' and see how it looks. Safe to say that I enjoyed this that I might consider adding more weapons in the battle arena...if I have time.

Armour:
Making the chains was using the hoop model and changing the divisions and sides to a smaller amount. This gave the hoop less poly count and I then duplicated them until I made a chain. (And yes I know I could have done this on Zbrush..but never mind). After making the chain I created a cube cut and extruded the object until it looked convincing enough to be a sharp shoulder pad for my statue.

Entire Model Together:
This is what my statue looks like with all the objects put together. So far so good.

My objects and adding the right texture to it.


Texture for Chain, Throne and Hammer:
For the texture I had to alter a few things. Using the statues texture and then getting rid of the lines (by going on Photoshop and using the spot healing brush and making it a lighter grey) , I was able to make the texture for the other models. 
This was the statue texture being changed and used for throne, hammer and chains.

Final Objects Modelled:
This is the texture that I am going to use for my final statue design. This texture was perfect because it blends in well with the statue, yet is much lighter than the statue itself, so everyone can see it. I was pleased with what I have achieved considering the time I have left. Let us see what I can do with all this being placed inside my battle arena.

Friday, 1 April 2016

Battle Arena Re-made

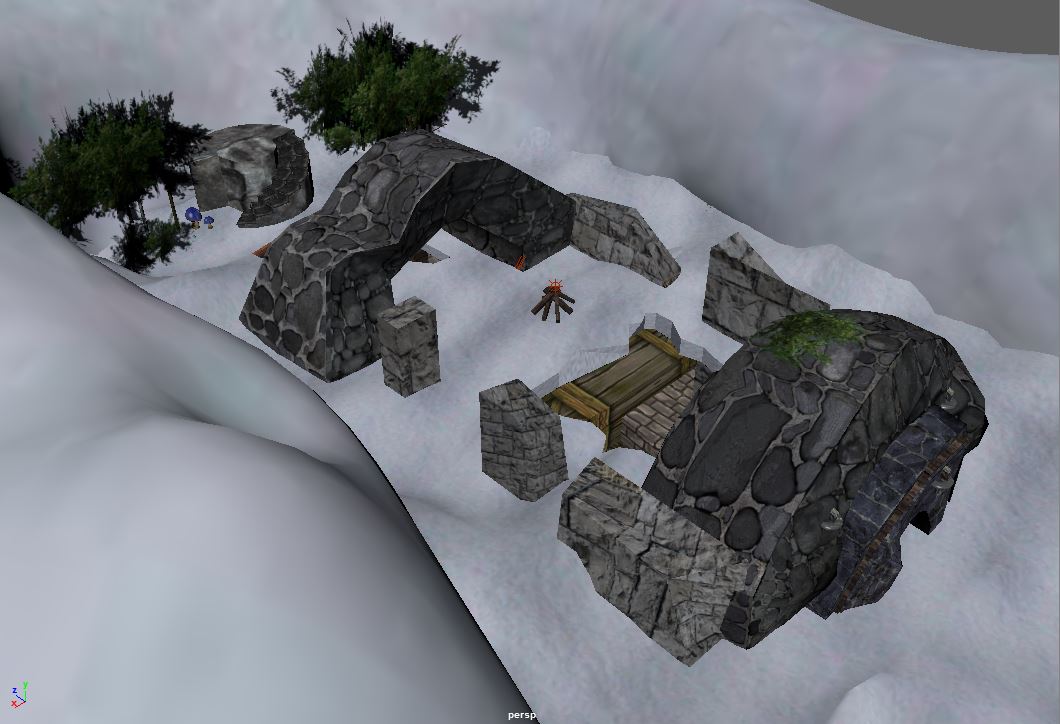
The image bellow shows my battle arena remade. I felt this was very necessary for improving the arena. Especially after gaining feedback from my tutor to improve the model.  The first thing to change was the mountains themselves. For this I used cloth effect, simply because I couldn't model mountains that well. Though this wasn't the best way of making a mountain model, I was satisfied with the result and it by far looks better than my original attempt.

I also changed a few other things since the last time I uploaded my battle arena, including:


New Textures and Models: 
Both inside and outside the cave had to be changed, for example I got rid of one of the pillars and changed the chairs. But the main changes was the textures. From the snow to the walls around the room. I also used the same textures of the statue for the stairs.

As I said before, I changed the snow texture by using a different image from Google, and it looks much better and more convincing. I also changed the texture of the ruins to match the wall texture down stairs.

I felt as though I needed something to help give a good introduction for my animated camera scene on unity. So I pushed the snow downwards and added stairs to give the cave/temple an entrance. Usually temples and caves would be at high places, so it would make sense to  have huge stairs to a holy place or a place of rich history. 


The final thing I improved was the stair way for the statue. This wasn't as easy as I would have hoped, because the UV mapping for this took a while to sort out and tidy up. However, once I finished the UV mapping for it, I used the texture from the statue and (just like the chain and throne texture) used the spot healing brush to get rid of the lines. This would blend in well with my statue as I plan on place it on top.


These changes improved my battle arena hugely and I was glad that I went back and improved it as I was more confident with my modelling skills then when I first started the year.  

Wednesday, 9 March 2016

Animation and Rigging

Animation:
For this lesson we got a chance to learn how to animate objects and rigging them. This comes as good practise for rigging our statues into positions we want as well as adding other elements to our battle arena.
Making the Pole and Ball move:
The first part of this exercise was to make a ball and a pole move. One rigged to go up and down, the other to move side to side.
Making a ball bounce.
Animating a rat:
The next part of this lesson we had to model a rat sized object. Then we had to draw a line path for our modelled rodent to move across. I felt as though building my rat was the easiest part of this exercise, the hardest part was rigging the damn thing to move! But I digress. After a little confusion with the frame settings I managed to animate my rat to get from point A to point B (the start and end of the line).

This could be used for my battle arena to make it feel more alive. However depending on how much I get done before the deadline also plays a part in this.  But it was good fun to animate objects and another skill that I have learnt on Maya can be ticked off the list.

Skeleton Rigging- moving the model into sitting position:
Now comes the hard part.. rigging my statue into a sitting position. To make this setting I went onto "windows"- animation edit- then clicked on human IK. I then chose to create the skeleton and it opened with the skeleton on my statue. Then I had to bind the skin onto the skeleton so that when I move the skeleton into position, then the skin will follow.
To move the skeleton in place, I had to select the circular joints and would have to choose to rotate or position it. This took me the longest to do, as I was struggling to make the model and the skeleton as similar as possible. But eventually I managed to place everything into the right position.
After being satisfied with the positioning of my statue I then got rid of the skeleton and now it has set the model into that position permanently. 

Now that it is finally done, I can now concentrate on making the hammer and armour for the statue to complete it as well as adding the textures for the throne. This was a very hard thing to learn and I had to be patient and had a bit of help to fix the rigging, but I am just glad that I have completed the poster for my statue.
Finished rigging statue

Tuesday, 23 February 2016

Using xNormal and Quixel for statue texture

Quixel was a huge help for my texture issue. I was finding it hard to work with a realistic texture on Photoshop so if anything, this was a huge improvement to my previous attempts
It wasn't easy to learn Quixel, in fact I still struggle with it now and again. But as you can see from the result, it can be rewarding. The first thing I had to do was to import my Zbrush statue file onto xNormal. Using the Low and High poly versions, I was able to then change the settings to normal map and albedo map before finally baking the UV's. After completing this I then opened Quixel and used the different UV maps. Placing them onto Quixel was the easy part. It was just finding the right texture that took time.

Statue Diffuse Map:

Statue: Zbrush low Poly:

Statue Normal Map:

In the end I chose the stone-statue texture and added lightly on Photoshop snow in the cracks of the statue. It is finally finished. My texture for the statue was complete. Just have to finish the textures for the armour, hammer and throne and rig my statue in position and then it will be good enough to be place it with my battle arena.

Monday, 22 February 2016

Putting Statue in Zbrush

After making a cube on Zbrush in class it was time to put the practise to the test. For this task, I was to do the same technique with my cube on Zbrush, but this time instead of the cube, it was for my statue.
 So as I said before this is going to be a repeat of what I did with the cube to place it onto Zbrush. 
The plan is to export the finished model (UV mapping needed to be neatened) as a OBJ. Then we had to import it onto Zbrush (just like the cube we practised on). Once I began to model; using a soft brush for the muscle form, crease brush for the cloth and belt (also we downloaded a cracks and chip brush), that's when the muscles and detail in the clothes began to take form.


Image showing that my statue is taking form in Zbrush.

I then had to save it as two separate files. One showing the Low Poly model and the other showing the High Poly. This will come into play for using the xNormal program. There I will plan on baking it and gaining all the different UV maps I will need to give my statue detail (perhaps even texture).

Final Zbrush models:
Low poly version:

High poly version: