Friday 27 November 2015

New feedback for walking simulator

I was given another chance to show my walking simulator and have I have improved it since the last time I was given feedback.


It is pleasant to see more positive feedback from people and I appreciate that they are seeing the improvements being made. I just need to work on the sound effects, text and a bit of scaling changes, then hopefully I should be near the finish line.  

Frog Design

In class we had look at some examples of anthropomorphic character designs and the thinking behind their development.

 Like all my designs, I will create a moodbaord on how most frogs are formed for example their body and face postures. 

 Drawings:
These are just rough sketches and ideas on what my final frog would look like. It could be a wizard frog holding a gun, or possibly a gentlemen frog having tea. 

Ideas for final work from other artist:

Final painting:


Wednesday 25 November 2015

Life Drawing week 10

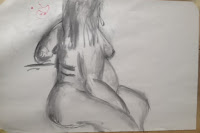
This lesson was a more experimental one, we used different tools and view points to try something new. So for example drawing with different colours rather than black charcoal or pencil; in blues, reds and oranges.  It was a really goo practice and i liked the idea of using different colours to draw with.

This was me not quiet understanding the task. The first drawing was me trying to draw the model using a triangle shape, to give it a perspective effect, however it didn't work quiet as well and I had to re-do the drawing. The second drawing was much better as you can see above. 


Sci Fi door & Brick Wall (Combined tutorials)

Brick Wall modelling technique:

For this lesson, I was to try and learn how to create a Sci Fi door. However since it wasn't relevant for my battle arena, I hanged the texture into a brick floor. This work also links to the brick wall that I tried to make during class. Though failing, this was to be my second attempt at making it using the door tutorial.

Firstly I had to go back to making the actual bricks. I did this by using a cube and duplicating it, to make two blocks. Then I used the multi cut tool to add lines whilst also changing the form of the cube by using the sculpt tool.


After repeating this with more cubes and shrinking the scale and smoothing the edges, it was time to add 5 to 6 different type of texture. I then laid them out. And scaled the blocks to leave a gap between.


I then put two planes on top of the bricks, one near bellow, the other near the top. Though I had to leave a bit of bricks showing so that it can give the cubes a stone like effect.


The Sci Fi Door technique added: 

Now having the model I was able to use the panel tutorial.


The picture bellow shows me adding a diffuse, ambient occlusion and displacement to the three images of my blocks. I then had to bake them and in doing so this would show 3 different images.

(show three images of baked brick wall>>>)

I then went on Photoshop and opened the Launch Quixel Suite, this should also load Photoshop. (by Clicking on the orange D).


Once I finally imported the brick wall onto Photoshop, I had to experiment with the textures for the bricks.


And the two images shown bellow was my final outcome.


Though I did consider using my brick floor for my battle arena, it seemed to bright and to colourful for my dark temple. So I remade the texture on Photoshop and used this instead.

Monday 23 November 2015

Tank

Following our session on cubes and using different tones, came the task of making a tank and using the technique of shading in the dark's and lights.  

My Moodboard: 
 I first looked up what real tanks look like, and also added a few other artist's designs to help me come up with an idea of what my tank would look like.  

 I thought it would be useful to try and experiment forming a tank using my cube from the lesson before. it was to be a guide in order to help me make a tank. 


I must mention that once my tutor and I looked at the development of my tank, there was one massive issue in the way. The tanks snout was far to big, almost cartoonish, So had to rearrange the tank into looking more believable.


Final Tank:

This final piece looks rushed, that is because it was. You can tell there are many things still either unfinished or a few shadows and lights needed adding to make it less 2 and more rounded. However I will just have to take this on board and stride forward. It is no secret that I hate drawing tanks, painting them is worse in my book. But at least I have something to show for my efforts.  


Thursday 19 November 2015

Week 5: life drawing

Week 8: life drawing


Life Drawing week 9

This week we combined both what we had learnt from visual design and life drawing on perspective drawing.  


This is where we had to use the model and as he stood, where placed four pieces of a4 paper having the same shapes. A circle with a cross in the middle. This activity was suppose to help us understand the perspective side of life drawing. For example the paper and arrows getting smaller as the view point goes further and further back.


Monday 16 November 2015

Cubes

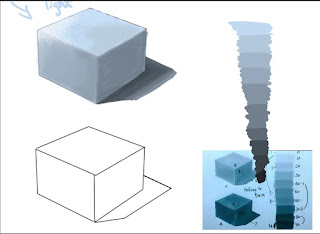
For this quick lesson, we first looked at how light and shadows are not only painted in black and white, but has to fade. for example the cube that I had done shows the direction the light is coming from and the colours I used to blend the light, fading it to a dark blue, then to almost violet. 


Wednesday 11 November 2015

Life Drawing week 8


Once again it was time for more life drawing. Only this time we had to draw with a different tool. It was to be done in pencil and for the 3rd image we had to draw with our weaker hand...as you may have guessed this wasn't easy for me. Though it was a struggle at first I began to get more comfortable with drawing. I dare say iv even gotten better since the first time I did life drawing back in September.

The last two images was me trying to draw certain parts of the models body, mainly the leg and the hip. The task was for us to concentrate on one part of the body and add as much tone and shading to it as possible. This was fun to do and I was pleased with the sketches I  produced from this weeks lesson.